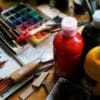
Oils are one of the great classic media, and have dominated painting for five hundred years. They remain popular for many reasons: their great versatility, offering the possibility of transparency and opacity in the same painting; the lack of colour change when the painting dries; and ease of manipulation. The colours are made by dispersing pigments in linseed or safflower oil and generally come in tubes. They can be used thickly, straight from the tube, or thinned with a solvent such as turpentine or white spirit. Winton Oil Colours offer a range of colours manufactured to the highest possible standards within moderate cost limits, making them ideal for use by all artists.
Unlike acrylics, they are slow-drying, which means you can rework sections, or scrape off the paint from a part of the painting that has not succeeded and start again.
Oils are the original medium to paint in. Acrylics have their own properties but it is oil that really makes the painting look “deep”.
Remember – JUST PAINT!
TIPS On OILS:
o Colour Mixing:
Be methodical in your colour mixing. Haphazard mixing will only result in muddiness. It is best to start with a palette of three or four colours, then add one or two more as you gain experience. Adding white to a colour produces a tint. Adding black produces a shade.
We have listed above the selected colours we prefer, but even just three colours, plus white, will produce a wide range of tints. Try the following three basic colours to begin with: 1. Alizarin Crimson; 2. Cadmium Yellow Hue; 3. French Ultramarine. You can make a range of colours by simply mixing your paints. For example, you can make a good orange from Alizarin Crimson and Cadmium Yellow Hue. Browns can be mixed from a combination of all three colours; try also replacing the Cadmium Yellow Hue with Yellow Ochre for a different shade.
o Creating Pastel Colours:
Experiment by adding white to each of your colours in increasing quantities: you will create a lovely range of strong and pale tints.
o Mixing a Good Range of Greens For Landscapes:
When you look at a landscape you can see at once that although most of the elements in it may be green, they are not likely to be the same green. So resist the temptation to reach for the tube of green paint all the time, or you will find that your paintings lack subtlety and, indeed, trueness to life. Mix a range of natural greens from the other paints.
A little more on color theory & mixing oil colors:
Certain colors are not only well suited to blending but can be used to create a basis for an entire genre of personal colors. Skin tones often become a stumbling block for artists. Nothing is sadder than a beautifully captured portrait diminished by skin tones that are not healthy and alive. This can be avoided by combining two simple colors, cadmium red light and cadmium green light, in equal amounts to create a rich dark brown that can be softened with white to achieve a dynamic skin basis. The degree of white and other subsidiary tones will create a glowing flesh tone and is easily repeatable. To this basic flesh tone mix, you can introduce a tiny bit more red for a ruddy coloration. Add a very small amount of cadmium yellow light or medium and you create a sallow skin tone. Add more green to the initial flesh tone and you create yet another useful skin tone. Many portrait artists keep on hand premixed colors in all of these families because any face has areas where the tone changes. One of the three mixes listed above might be just the ticket.
Combining black (lamp black or ivory black) with cadmium yellow is another hand-mixed color that is fun to create. The resulting tone of green is the picture of springtime and is very useful to landscape painters. If not for large areas, this bright, cheery tone makes an excellent highlight for any foliage.
The same is true for the combination of cobalt blue and cadmium yellow. The tone created is another bright green that leans to the blue and is again a wonderful tone for spring green landscape work.
Cadmium red, cadmium yellow and a tiny bit of blue yield a glorious orange just right for sunset or fall foliage paintings. Add a bit more blue and the tone dulls to a more pumpkin or sedate orange and is very useful in forest interior work, foregrounds and stones in open landscape scenes.
A covered palette allows mixed oil colors to stay soft and serviceable for several days or even weeks if the cover is tight. But for large-scale works or long-term use of specific colors, it is advisable to create a larger quantity of color. Storage can be in saved baby food jars (keep the lid and the jar threads clean for easy opening) or perhaps you might like to buy metal tubes in which to pack your “private label” colors. (Remember to name them and keep a record of how you mixed that special color). Open-ended tubes are available in most art material stores. Mailing labels are great for labeling your tubes. One tip is to roll the bottom of the tube tightly and do not trap air between the bottom of the tube and the store of paint.
Experimentation with the oils you might already have will get you started and give you a chance to explore many possibilities as well as be creative.
Long handles are traditional for oil painting, however, they are not necessary. Short handle brushes accomplish the same effect.
How to Paint Clouds and Trees
Fluffy white, soft and fragile–So they look, but clouds can be a challenge to paint. Almost every medium has its own strong points for application in the painting of clouds and skies, and each offers great opportunities for growth as an artist.
Oil painting of clouds and skies offers the option of flexibility in that the medium is very forgiving. Oil’s slow drying time means you have countless opportunities to adjust, augment, and alter the shapes, shadows and reflected tones. This is perfect for the artist who loves to manipulate the medium to achieve the fullest potential. The use of underpainting to build tones that will glow through the finished cloud and sky areas is one of the most popular reasons to work in oil. The translucent glow through the obvious tone to the implied tone beneath adds to the painting’s long-lasting appeal.
Start by washing in a warm glow over the entire sky. Over this tone layer light applications of the soft sky and cloud tones. Build layers to create a deep and velvety glow. Remember that the clouds are reflectors for all other tones in the work, even the earth tones of the landscape or the vivid tones of a cityscape. White reflects and is a wonderful area in the painting to draw the foreground, middle ground and background together.
The application of oil can be accomplished with traditional tools such as brushes and knives but can also be softened and “personalized” by using unconventional tools. Natural sponges hold up very well for use with oil colors and mediums. Odd tools like cotton buds and small scrap/rag cloths are also useful in moving, blending or removing color. They can also be used to add texture to areas, even to create a unique look. Try other materials for other effects, such as cheesecloth to lay on washes over the base warm glow. The texture of the threads will yield a distinctive “feel” to the finished piece.
Although underpainting is unnecessary, if you practice that technique, you will achieve a depth and richness to be envied. Allow a bit of a bright tone to peep through the overall sky color, suggesting the hidden secret under the sky, and you will build interest. The tone you use for underpainting could be a sunset red or orange. Although this sounds severe, allowing tiny portions of this tone to show will give an overall glow to the work–an unexplained source of light and warmth.
Once the overall tone is established, work in the areas of clouds. The initial shapes can be soft, but you will want to build to a more robust “thick” look, giving the shapes real dimension. Shadows are important and the same reflected colors mentioned in reference to oil painting. The glowing and reflections are essential to realistic clouds.
Once you have completed the painting, you might want to consider coating it with a varnish or medium. In the case of oil painting, there are several varnishes to consider, even some with UV protection to help preserve the colors. It is customary to do a final coating of some sort over oils because they often dry with an uneven surface quality. Dry areas and shiny areas need to be blended to a more uniform look. This is easily accomplished with one of the products designed for final coating of paintings. Acrylic mediums do essentially the same thing, offering a uniformity of surface sheen. They also give the surface a final protective coat, useful since the work is usually displayed without glass or other covering.
Whether you brush, knife, sponge or use another tool, there are limitless challenges and rewards to capturing skies and clouds in your paintings. Go outside, look up and paint!
Enjoy your painting!
Source by Sharon Shurkin
Disclaimer: The views and opinions expressed in this article are those of the authors and do not necessarily reflect the official policy or position of Irish Artmart.
Explore Original Irish Art
Discover original Irish paintings, prints, and commissions from talented artists across Ireland.
Browse Art