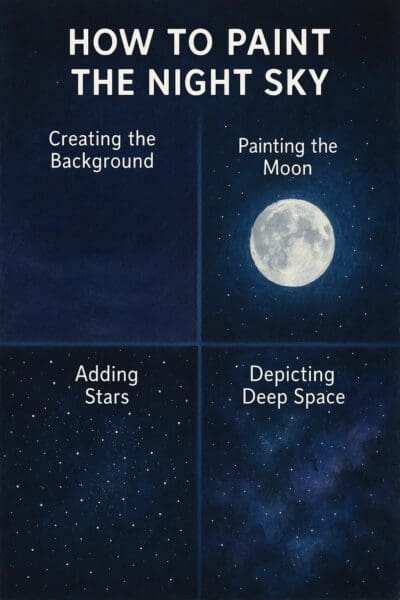
How to Paint the Night Sky: Tips for Creating Stars, Moon, and Deep Space
Introduction
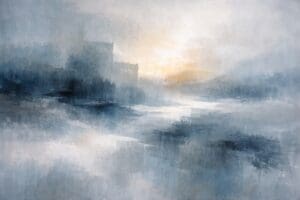
For many artists, the night sky offers a captivating and mystical subject. The stars twinkle in the dark expanse, the moon casts a soft glow over the landscape, and the vastness of space stretches into infinity. Painting the night sky, whether in watercolors or oil paints, is an exciting challenge that allows artists to experiment with color, light, and depth. Capturing the ethereal quality of the cosmos requires careful techniques, patience, and an understanding of how to render the glowing objects within it.
In this guide, we’ll explore step-by-step techniques for creating a compelling night sky, focusing on the elements that define it: the moon, stars, and the depth of space itself. Whether you’re working in watercolors or oil paints, this tutorial will provide you with the tools and tips you need to bring the night sky to life.
Materials You’ll Need
For Watercolor Painting:
- Watercolors: Choose a high-quality set of watercolor paints. For night sky scenes, you’ll need dark tones like indigo, payne’s gray, and ultramarine blue.
- Watercolor Brushes: A mix of large flat brushes and finer round brushes will give you the flexibility to cover large areas and add fine details.
- Watercolor Paper: Cold-pressed, 100% cotton paper will allow for better pigment absorption and texture, which is essential for a beautiful night sky.
- Masking Fluid: Essential for protecting the white areas of the moon or stars.
- Gouache or White Ink: Used for adding the glowing effect of stars.
For Oil Painting:
- Oil Paints: Deep hues like ultramarine blue, dioxazine purple, and black will create a stunning, dark night sky.
- Brushes: A combination of large flat brushes, round brushes, and fan brushes.
- Palette: For mixing your colors. You’ll need a good surface for mixing oil paints.
- Canvas: Pre-primed canvas or a gessoed board.
- Medium: Linseed oil or alkyd medium will help in mixing paints and creating smoother layers.
- Palette Knives: For texturing and splattering stars or galaxies.
1. Preparing the Canvas or Paper
Preparation is the key to achieving the best results in your night sky painting.
Watercolor:
Start by securing your watercolor paper to a board using masking tape or artist’s tape. This will keep the paper flat while you work, preventing warping. Apply a light wash of water to the surface before you start painting the sky to allow for smoother blending. This technique will help achieve the soft, gradient look of a night sky.
Oil Painting:
For oil paints, it’s best to start by priming your canvas or board if it isn’t pre-primed. Apply a thin layer of gesso to the canvas and allow it to dry. Next, apply a thin coat of dark-colored paint—such as a mixture of black and ultramarine blue—to serve as the base of your night sky. This layer will provide the perfect foundation for layering the stars, moon, and other elements later.
2. Creating the Background of the Night Sky
The first step in painting a night sky is to establish the background. Whether you’re working in watercolor or oil paints, the color you choose will help set the tone for the rest of the painting.
Watercolor:
For a beautiful night sky in watercolor, begin with the wet-on-wet technique. Lightly moisten your paper with clean water, using a large flat brush. Once the paper is damp, apply a mixture of indigo, payne’s gray, and ultramarine blue to the wet surface. Allow the colors to naturally blend into each other, creating a smooth, gradient effect that fades towards the horizon.
For areas that need to be darker, such as the upper portions of the sky, build up layers of color in a controlled fashion. Keep the bottom part of the sky slightly lighter to create the illusion of atmospheric perspective.
Oil Painting:
In oil painting, start by applying a dark base color to the canvas, as mentioned earlier. Use a large flat brush to spread the paint evenly. The colors you choose will depend on the mood you wish to create. For a deep, mysterious sky, use a combination of dioxazine purple, ultramarine blue, and black.
Blend the edges of your dark sky, allowing for a gradual transition to lighter hues near the horizon. This will mimic the atmospheric fade of a natural night sky.
3. Painting the Moon
The moon is one of the most iconic elements of the night sky, and capturing its soft glow is a challenge that requires careful attention to detail.
Watercolor:
In watercolor, masking fluid is a great tool for protecting areas where the moon will be. Apply the masking fluid to your moon’s shape before you start painting. Once the masking fluid is dry, paint around the moon using your background colors.
Once the paint dries, you can carefully remove the masking fluid to reveal the white shape of the moon. To give the moon a soft glow, use a light wash of gray (mix payne’s gray and cerulean blue) around its edges. You can also use white gouache to highlight the moon’s surface.
Oil Painting:
For the moon in oil paints, start by outlining its shape using a light gray or off-white color. Blend the edges of the moon with your background colors, making sure the transition is smooth to create the illusion of a glowing orb in the sky.
Once the moon is painted, you can add texture to its surface using a palette knife. Raw umber and white mixed together will give the moon’s surface a rocky texture, adding realism to your piece.
4. Adding Stars
Stars are the defining feature of a night sky. They provide a sense of depth and wonder, and there are multiple techniques to achieve a glowing starry effect.
Watercolor:
For watercolor, splattering is the easiest way to create stars. Once your background has dried, take a toothbrush or a stiff-bristled brush, dip it into diluted white gouache or white ink, and flick it onto the paper. Vary the pressure on the brush to create stars of different sizes.
You can also paint individual stars by adding small dots of white gouache or Chinese white using a fine-tipped brush.
Oil Painting:
For oil painting, use a small round brush or a palette knife to create stars. Use a light, diluted white paint, and gently dot it onto your canvas. For a glowing effect, blend around the stars with a clean, dry brush.
If you want to create distant galaxies or nebulae, you can use a fan brush to add soft, diffused splashes of light in a circular motion.
5. Depicting the Vastness of Space
The sense of depth in your night sky is essential to creating a realistic portrayal of the cosmos. To depict space, use gradients and atmospheric perspective.
Watercolor:
In watercolor, apply several layers of transparent color, starting with the darkest hues and moving to lighter ones. Use indigo, dioxazine purple, and payne’s gray to create the layers of depth. Gradually add white gouache to the mix to show the nebulae or galaxies glowing in the distance.
Oil Painting:
Use the technique of glazing in oil painting to achieve depth. Start by applying transparent layers of paint. Gradually add layers of transparent red, purple, and blue to enhance the depth of space.
6. Adding Nebulae and Galaxies
Creating nebulae and galaxies within your night sky painting adds interest and complexity. These elements can bring the vastness of the cosmos to life in your painting.
Watercolor:
For nebulae, use a wet-on-wet technique and apply bright colors like crimson, cerulean blue, and permanent violet. Allow the colors to mix and blend naturally on the wet paper to achieve a soft, cloud-like effect.
Oil Painting:
For oil painting, use a fan brush to create soft, swirling motions that simulate the appearance of nebulae. Use a combination of colors like dioxazine purple, cadmium red, and ultramarine blue for the nebulae, and blend them softly.
7. Final Touches: Enhancing the Glow
The final step in any night sky painting is to enhance the glowing effects of the moon, stars, and galaxies.
Watercolor:
To enhance the glow, use white gouache or white ink to add subtle highlights to your moon and stars. For soft glowing edges, gently lift off paint around the moon or stars with a clean, damp brush.
Oil Painting:
To enhance the luminosity of your stars and moon, apply a glaze over the painted areas with a glazing medium. Use a soft round brush to create soft highlights around the moon and stars.
Conclusion
Painting the night sky can be a deeply rewarding artistic endeavor, whether you’re working in watercolor or oil paints. The techniques shared in this guide will help you create stunning night sky scenes filled with glowing stars, a luminous moon, and the vastness of deep space. By mastering the blending of colors, the use of masking and glazing, and paying attention to light and shadow, you can capture the ethereal beauty of the cosmos on your canvas.
Remember, the night sky is a constantly changing and mysterious subject, so don’t be afraid to experiment and find your unique approach. With patience and practice, your celestial landscapes will come to life with every brushstroke.
*For collaborations, art features, or inquiries, please contact us at [email protected]. Don’t forget to follow us on Instagram, Facebook, Twitter.
Disclaimer: The views and opinions expressed in this article do not necessarily reflect the official policy or position of Irish Artmart.
Irish Artmart – Your Gateway to Artistic Excellence.
Image by Anamul Haque from Pixabay
Explore Original Irish Art
Discover original Irish paintings, prints, and commissions from talented artists across Ireland.
Browse Art